How Lighting Affects Your Skin on Camera (And What to Do About It)
You take a selfie in the morning bathroom light and immediately want to delete it. Then you step outside, snap another photo, and somehow look completely different — maybe even better. Sound familiar? Understanding how lighting affects skin on camera is the single most powerful thing you can do to improve how you look on video calls, photos, and recordings. The difference between looking washed out, splotchy, or tired versus healthy and radiant often has nothing to do with your skin itself — it is entirely about the light hitting your face.
This guide breaks down the science, the color temperature numbers that actually matter, and practical steps you can take right now, regardless of your skin tone.
Why Your Skin Looks Different on Camera Than in the Mirror
Before diving into color temperatures and light sources, it helps to understand the fundamental gap between what your eyes see and what a camera captures. Your eyes are remarkably adaptive. They constantly recalibrate to account for changes in light color, shadow depth, and contrast — a process called chromatic adaptation. Camera sensors do not do this automatically, or at least not as gracefully.
When you look in your bathroom mirror under harsh overhead lighting, your brain compensates so skin tones appear relatively normal. A camera sensor, however, records exactly what the light is doing — including the color cast it throws onto your face. This is the root cause of the "why do I look bad on camera" problem that so many people wrestle with.
There are three main factors at play:
- Color temperature — how "warm" or "cool" the light source is, measured in Kelvin (K)
- Direction — where the light is coming from relative to your face
- Diffusion — whether the light is hard (direct) or soft (scattered)
Each of these variables interacts with your skin's undertones, surface texture, and the camera's white balance setting to produce the final image. Getting even one of them wrong can make pores look larger, dark circles look deeper, or your complexion appear uneven.
The Color Temperature Guide: 2700K vs 5500K (and Everything In Between)
Color temperature is measured on the Kelvin scale and runs from warm orange tones at the low end to cool blue tones at the high end. For skin on camera, this matters more than almost anything else. Here is a practical breakdown of the most common light sources you encounter:
The sweet spot for most people on camera sits between 4000K and 5500K. At this range, your camera's white balance can lock in a neutral reading, which means your natural skin tone comes through without an artificial orange cast (too warm) or a sickly blue-green shift (too cool).
The infamous "why do I look bad on camera" feeling that strikes during office video calls is almost always caused by overhead fluorescent fixtures in the 6000–7000K range. These lights cast a cool, slightly greenish hue that cameras faithfully capture, draining color from the face and making the under-eye area look significantly darker than it actually is.

How Different Light Sources Affect Skin Texture and Imperfections
Color temperature is only half the story. The quality of light — specifically whether it is hard or soft — determines how clearly texture, pores, and surface imperfections appear on camera.
Hard Light vs. Soft Light
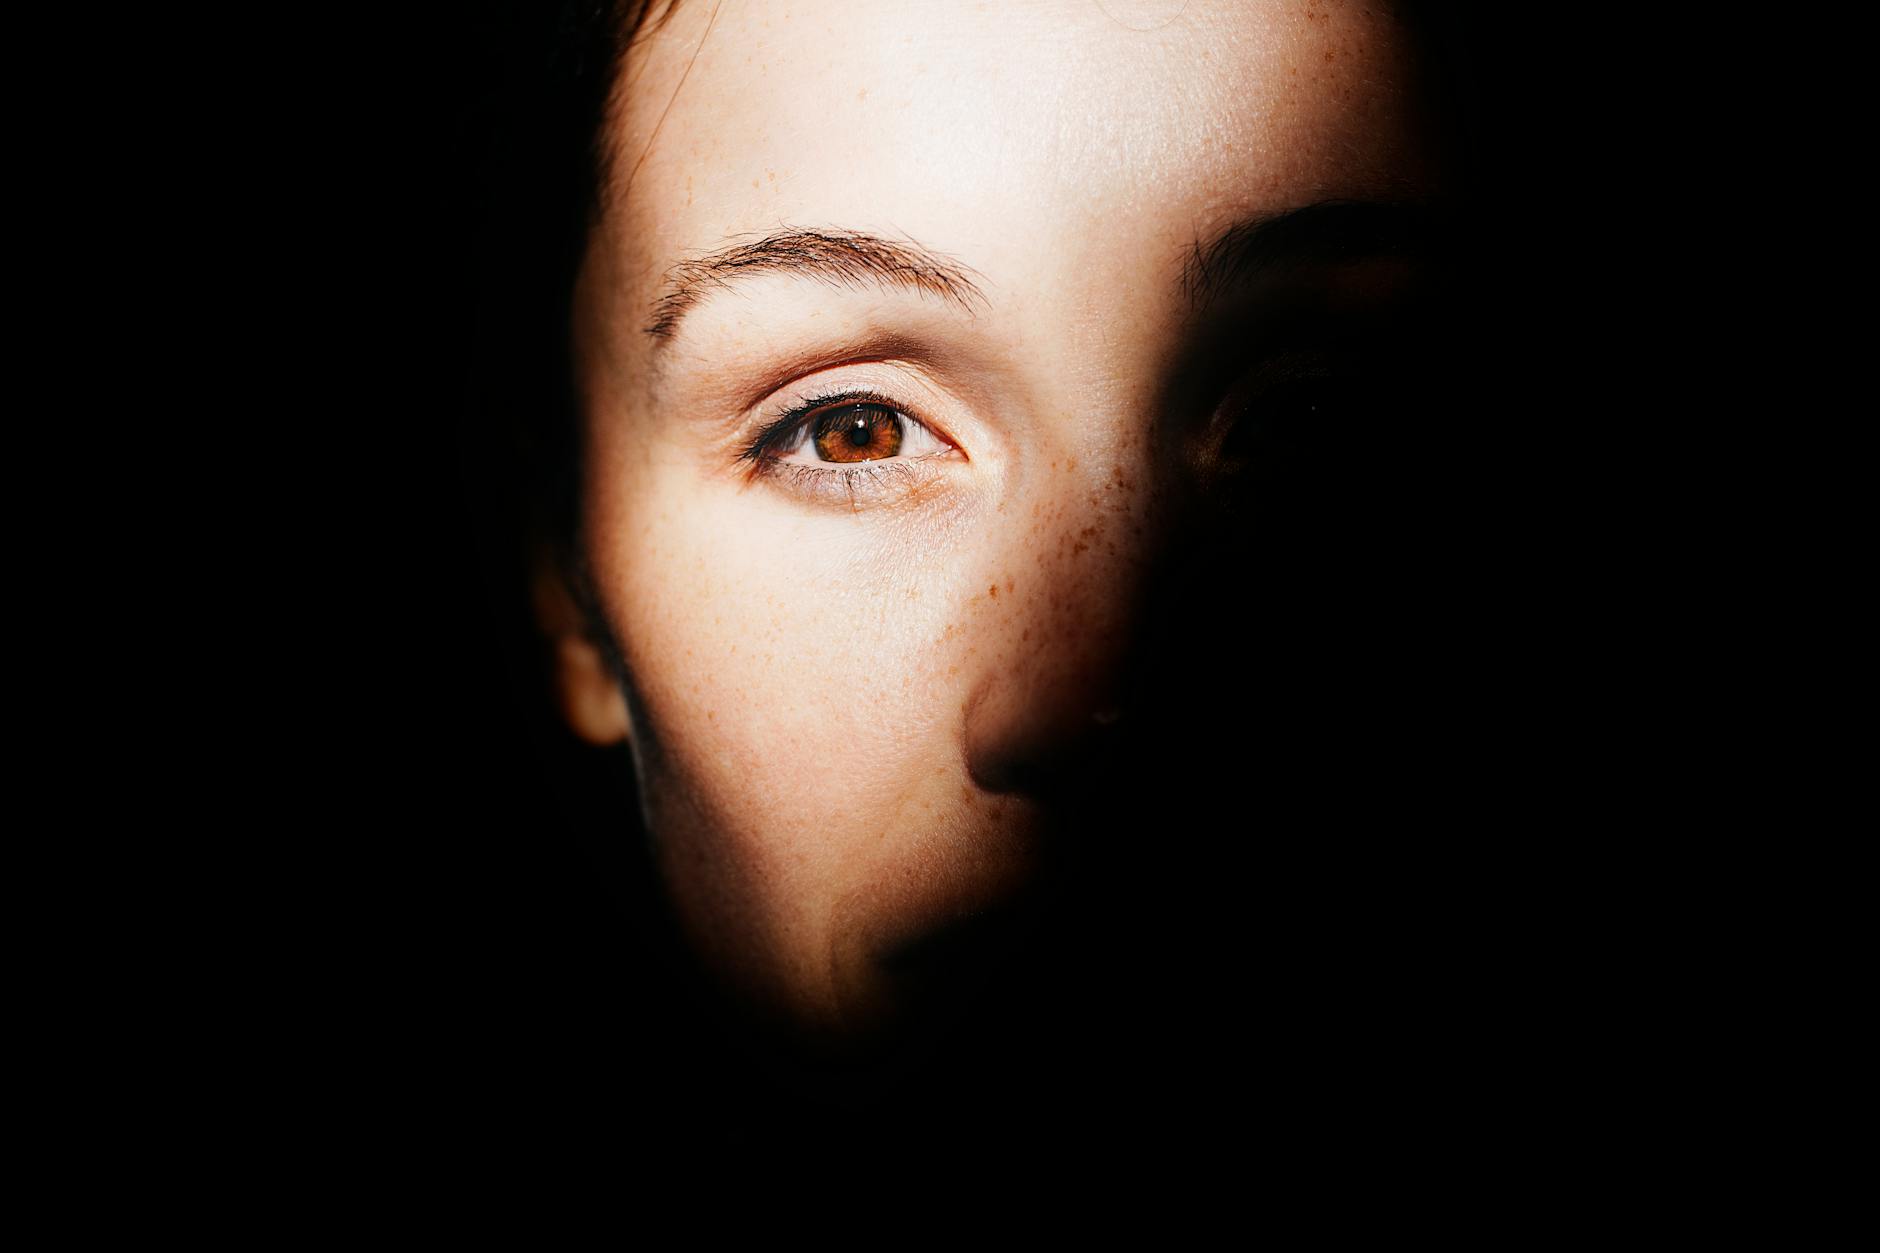
Hard light comes from a small, concentrated source — a bare lightbulb, direct sunlight through a narrow window, or an unmodified ring light placed close to your face. Hard light creates sharp, defined shadows. On skin, this translates to every pore, fine line, and texture variation casting its own tiny shadow, making the surface look significantly more uneven than it does to the naked eye.
Soft light is diffused across a larger area — think a large window with a sheer curtain, an overcast sky, or a ring light with a diffuser panel. Soft light wraps around facial features, filling in the micro-shadows that make texture visible. This is why portrait photographers almost universally prefer soft light, and why reducing imperfections on camera is so much easier with a diffused source than a bare one.
Direction: Where Light Falls Changes Everything
The angle of your light source relative to your face has a dramatic effect on how your features read on camera:
- Overhead (top-down) light — Creates deep shadows under the eyes, nose, and chin. This is the classic "tired and sickly" look. Most office ceilings are guilty of this.
- Under-lighting — Light from below creates unnatural shadows that read as eerie on camera. Avoid laptop screens as your only light source for this reason.
- Side lighting (45-degree angle) — Adds dimension and depth. Flattering for bone structure but can emphasize texture on the far side of the face.
- Front lighting (straight ahead) — Minimizes shadows and evens out skin tone. Best choice for video calls and reducing the appearance of imperfections.
- Front-and-slightly-above — The gold standard. Light coming from roughly eye level to 30 degrees above, slightly in front. This mimics the most flattering natural window light.
Camera Lighting for Different Skin Tones
One of the most important and often overlooked conversations about camera lighting for skin tone is that light does not behave the same way on every complexion. Camera sensors and auto-exposure algorithms were historically calibrated using lighter skin tones as the default, which means darker skin tones are frequently underexposed or rendered with inaccurate color in suboptimal lighting conditions.

Fair and Light Skin Tones
Fair skin tends to pick up color casts very readily. A warm 2700K bulb will give fair skin a yellowish-orange tint on camera, while cool office fluorescents will read as pale or even slightly grey. The biggest challenges for lighter skin on camera are redness (which daylight-temperature LEDs at 5500K can accentuate) and washing out entirely in overexposed conditions.
Best approach: Use a warm-neutral light in the 3500–4500K range. Avoid placing lights directly overhead. Position your key light slightly to one side and slightly above eye level to add dimension without creating harsh shadows.
Medium and Olive Skin Tones
Medium and olive complexions tend to be the most versatile in front of a camera. They handle a broader range of color temperatures without dramatic color shifts. However, cool fluorescent light can still dull the natural warmth in olive skin, making it appear flat and grey on video.
Best approach: A 4000–5000K neutral white light provides excellent color accuracy for medium tones. Slightly warmer light (3000–3500K) can enhance the golden quality of olive skin on camera, particularly for video calls and content creation.
Deep and Dark Skin Tones
Deep skin tones face unique challenges on camera that go beyond just picking the right color temperature. Many consumer webcams and smartphone cameras struggle with dynamic range — meaning they cannot expose correctly for both a dark face and a bright background at the same time. The result is an underexposed face where details, expression, and skin texture are lost in shadow.
Best approach: Increase overall light brightness significantly — deep skin tones need more light volume to expose correctly on most cameras. Use a 5000–5500K daylight-balanced source for the most accurate rendering of deep brown and ebony complexions. Critically, make sure the background behind you is not dramatically brighter than your face, as this triggers the camera to underexpose your skin further.
The Science Behind Why Fluorescent Light Is So Unflattering
Cool fluorescent lighting — the kind found in most offices, retail stores, and commercial bathrooms — is particularly damaging to skin appearance on camera for two scientific reasons.
First, fluorescent bulbs do not produce a smooth, continuous spectrum of light. Unlike sunlight or incandescent bulbs (which emit a broad, continuous range of wavelengths), fluorescent lights produce spiked spectral output — intense peaks at specific wavelengths with gaps in between. This discontinuous spectrum means certain skin tones are reflected inaccurately. The well-documented greenish cast of fluorescent light comes from a spike in the green wavelength range, which camera sensors record faithfully even when your eyes compensate for it.
Second, fluorescent fixtures are typically installed in ceilings — directly overhead. As described above, top-down lighting is the single most unflattering direction for facial skin on camera. The combination of a cool, spectrally incomplete light source coming from directly above creates the perfect storm for making anyone look worse on video than they do in person.
Practical Tips to Improve How Your Skin Looks on Camera Today
Armed with the science, here are concrete, actionable steps you can implement immediately to improve your appearance on video calls, recordings, or photos.
Quick Wins for Better Camera Lighting
- Face a window during daylight hours. Natural window light, with you facing it, is free, soft, and naturally around 5000–6000K — nearly ideal for most skin tones.
- Switch your overhead lights off during video calls. If you can replace overhead fluorescents with a single lamp placed in front of and slightly above your face, you will see an immediate improvement.
- Buy a bulb rated 4000K. A single "neutral white" or "cool white" LED bulb in a desk lamp placed at eye level is enough to transform most home office video calls.
- Position your light source on the same side as the camera. Light should come from behind the camera, not from behind or beside you, to avoid silhouetting your face.
- Diffuse harsh lights. If you have a bright ring light or bare LED panel, add a diffuser, bounce it off a white wall, or place a thin white fabric in front of it to soften shadows.
- Adjust your camera's white balance manually. Many webcams and smartphones allow you to set a custom Kelvin value. Match it to your actual light source to prevent orange or blue casts.
- Eliminate mixed light sources. Having a warm lamp and a cool window in the same frame creates competing color casts that no white balance setting can fully correct.
Understanding White Balance and Why It Matters
White balance is the camera's attempt to neutralize the color of the ambient light so that whites appear white and skin tones appear natural. When it is set correctly for your light source, the camera accurately renders your skin color. When it is off — or when the camera's automatic white balance gets confused by mixed lighting — everything shifts.
Auto white balance (AWB), the default mode on most cameras and webcams, works reasonably well in consistent lighting but struggles when there are multiple light sources or when the light source changes (like a cloud passing over the window). For the most consistent, flattering results when you care about how your skin looks on camera, setting a manual white balance to match your light source's Kelvin value eliminates this variability entirely.
Most modern smartphones allow manual white balance in their pro camera modes. Many video conferencing platforms and webcam software applications also offer color balance adjustments — look for settings labeled "white balance," "color temperature," or "color correction."
How Makeup Interacts With Camera Lighting
Lighting does not just affect bare skin — it changes how makeup reads on camera too. A few key points worth understanding:
- SPF in foundation causes flashback under certain lights. Some sunscreen ingredients reflect light differently on camera, particularly with flash photography, creating a white cast. Under continuous lighting (video, ring lights), this is less of an issue but still worth knowing.
- Shimmer and highlight look very different at 2700K vs 5500K. Warm light turns cool-toned highlighters golden and can make silver or pink-toned shimmer look flat. Cooler light renders shimmer more accurately but can make warm-toned bronzers look orange.
- Matte formulas reduce imperfections on camera more effectively than dewy ones. Shiny, dewy skin reflects hard light and creates bright hot spots that cameras overexpose. A light setting powder over areas prone to shine can significantly reduce the appearance of texture and unevenness on camera.
- Color-correcting products look more dramatic under camera lighting. Peach and orange color correctors for dark circles can appear more visible under cool fluorescent light on camera, so apply with a lighter hand than you might in person.
Frequently Asked Questions
Key Takeaways
Understanding how lighting affects skin on camera comes down to three core principles: color temperature, direction, and diffusion. The specific numbers matter — fluorescent lights at 6500K are objectively harsh on camera, while a neutral 4000–5000K source is objectively flattering for a wide range of skin tones. Camera sensors do not compensate for color casts the way your eyes do, which is why the same face can look healthy in one light and washed out in another.
The practical changes you can make are simple and inexpensive. Face a window. Turn off overhead office lights during video calls. Place a single warm-neutral LED lamp slightly above and in front of your face. Match your camera's white balance to your light source. These adjustments, taken together, close most of the gap between what you see in the mirror and what the camera records.
For those who have wondered why they look bad on camera — the answer almost always lives in the light, not in the face. Change the light, and you change the image.