How to Keep Your Kitchen Knives Sharp: A Complete Guide for Home Cooks
If you have ever pushed a tomato across a cutting board instead of slicing cleanly through it, your knives are telling you something. Knowing how to keep kitchen knives sharp is one of the most practical skills a home cook can develop — not just for speed and efficiency, but for safety. A dull blade requires more force, which means more chances of the knife slipping and cutting something you did not intend to.
This guide covers the complete lifecycle of knife care: understanding the difference between honing and sharpening, choosing the right sharpening method for your setup, recognizing the warning signs of a neglected blade, and building a simple maintenance routine that keeps your knives performing like new for years.
Honing vs. Sharpening: Why Most People Confuse Them
The single biggest source of confusion in knife maintenance tips is the distinction between honing and sharpening. They are not the same thing, they do not do the same job, and you need both.
Sharpening removes metal from the blade to create a new edge. When a knife is truly dull — when the edge has been ground away or rolled so badly that honing cannot fix it — sharpening is the only solution. This is done with an abrasive surface: a whetstone, a pull-through sharpener, or an electric sharpener.
Honing does not remove material. Instead, a honing rod realigns the microscopic teeth along the blade's edge that get pushed out of alignment during normal use. Every time you slice, dice, or chop, those tiny teeth bend slightly. A honing rod straightens them back up, restoring a sharp feel without grinding away any steel.
Think of it this way: sharpening is a trip to the dentist, honing is brushing your teeth every day. The daily habit extends the time between major interventions and keeps performance consistent.

How to Use a Honing Rod Correctly
Most home cooks own a honing rod but use it wrong — or not at all. Here is the correct technique, which takes about 30 seconds once it becomes habit.
Step-by-Step: Using a Honing Rod
- Hold the rod vertically with the tip resting on a folded kitchen towel on the counter (safer than holding it in the air).
- Place the heel of the blade at the top of the rod at roughly a 15–20 degree angle for most Western knives (15 degrees for Japanese-style knives).
- Draw the blade downward and toward you in a smooth arc, moving from heel to tip while maintaining the angle.
- Alternate sides — three to four strokes per side is enough for routine maintenance.
- Wipe the blade clean with a damp cloth before cooking.
The angle is the most important variable. Too steep and you are scraping the flat of the blade against the rod; too shallow and the edge never makes proper contact. Fifteen to twenty degrees is roughly the width of a matchbook held at the base of the blade.
Use your honing rod every time you cook, or at minimum every two or three sessions. This simple habit can extend the time between full sharpenings to several months for a home cook.
The Main Knife Sharpening Techniques Explained
When honing is no longer enough — when the knife still feels dull after a few strokes on the rod — it is time to sharpen. There are four primary methods available to home cooks, each with its own trade-offs.
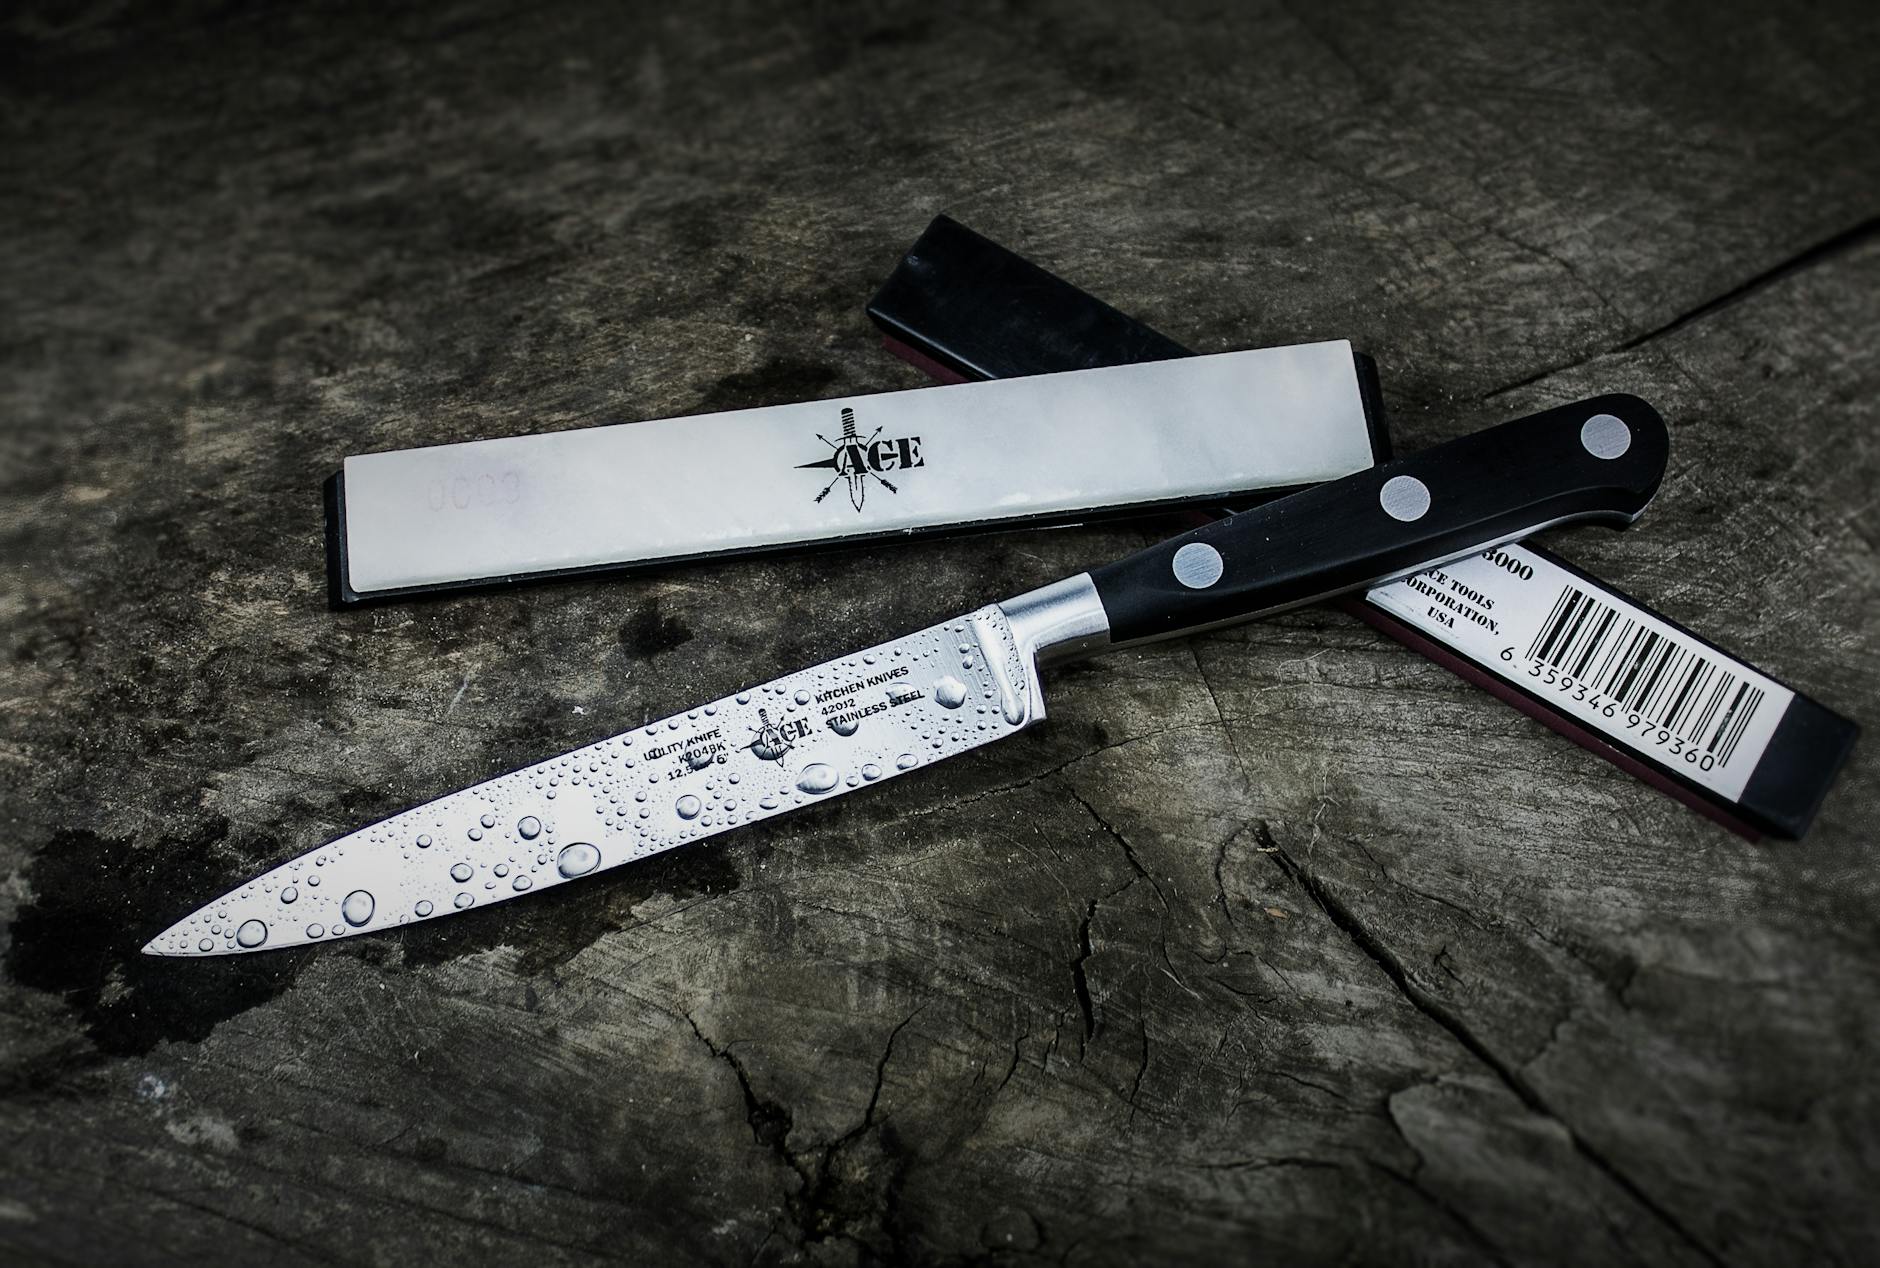
1. Whetstone (Water Stone)
A whetstone is the gold standard for how to sharpen kitchen knives at home. It gives you the most control, produces the sharpest edge, and is the method professional knife sharpeners use. The learning curve is steeper than other options, but the results are worth it.
Whetstones are rated by grit. A coarse stone (120–400 grit) repairs damaged or very dull edges. A medium stone (800–1200 grit) handles regular sharpening. A fine or polishing stone (3000–8000 grit) refines and polishes the edge after sharpening. For most home cooks, a combination stone with 1000 grit on one side and 3000–6000 on the other covers all bases.
Basic Whetstone Technique
- Soak a water stone for 5–10 minutes until bubbles stop rising (oil stones do not need soaking).
- Place the stone on a damp towel or non-slip mat, grit side up.
- Hold the knife at a consistent 15–20 degree angle to the stone surface.
- Using moderate, even pressure, push the blade forward across the stone from heel to tip as if slicing a thin layer off the top.
- Complete 8–10 strokes on one side, then match on the other side.
- Feel for a slight "burr" or rough wire edge on the opposite side — this tells you you have ground all the way to the edge.
- Move to the finer grit side and repeat with lighter pressure to polish and remove the burr.
- Strop the knife on a piece of leather or the back of a leather belt to align the final edge.
2. Pull-Through Sharpeners
Pull-through sharpeners are the most beginner-friendly option. You draw the blade through a V-shaped slot lined with ceramic rods or carbide edges, and the preset angle does the work for you. They are quick, affordable, and require no skill.
The downside: pull-through sharpeners remove more metal than necessary, wear knives down faster over time, and cannot match the edge quality of a whetstone. They also set a fixed angle, which may not be ideal for every knife. That said, for a busy home cook who just needs a quick fix, a quality pull-through sharpener is far better than cooking with a dull knife for months.
Look for models with at least two slots — a coarser slot for sharpening and a finer slot for finishing. Some three-stage models add a ceramic honing slot, which is useful.
3. Electric Sharpeners
Electric sharpeners use motorized abrasive wheels to sharpen the blade quickly and consistently. They are faster than whetstones, easier than pull-through models, and produce a reliably sharp edge. Higher-end electric sharpeners use diamond abrasive wheels and multiple stages to sharpen, hone, and strop in one machine.
The main drawback is cost — good electric sharpeners start at around $50 and climb well above $150 for professional-grade models. They also remove more metal per session than a whetstone, which shortens a knife's overall lifespan. For knives you use daily and want to maintain without much effort, an electric sharpener is a practical choice.
4. Built-In Cutting Board Sharpeners
Some cutting boards come with a built-in sharpening slot along one edge — typically a ceramic or carbide rod set at a fixed angle. These are the most convenient option, since the sharpener is always at hand when you are already at the cutting board. They work similarly to pull-through sharpeners and are best suited for quick touch-ups rather than restoring a badly dull blade.

How Often Should You Sharpen Your Kitchen Knives?
There is no single correct answer, because sharpening frequency depends on how much you cook, what you cut, and how you store and wash your knives. As a general guide:
- Honing: Every time you cook, or every 2–3 cooking sessions at minimum.
- Light sharpening (pull-through or electric): Every 2–3 months for a home cook who cooks 4–5 times per week.
- Full whetstone sharpening: Once or twice a year for well-maintained knives; more often if honing alone stops improving the edge.
- Professional sharpening service: Once a year for most home cooks who maintain their knives between sessions.
These intervals can vary significantly. If you cut a lot of dense vegetables, hard squash, or bone-in meat, your knives will dull faster. If you primarily slice soft foods on a wood or plastic board, they will hold their edge longer.
Signs Your Knife Needs Sharpening Right Now
Your knife will tell you when it needs attention — you just need to know what to look for. These are the most reliable indicators that sharpening (not just honing) is overdue:
- The paper test: Hold a sheet of printer paper by one edge and draw the knife across it. A sharp knife slices cleanly with minimal effort. A dull knife tears, crumples, or snags.
- The tomato test: A properly sharp knife glides through tomato skin with no downward pressure. If you are pressing or sawing, the edge is gone.
- The fingernail test: Rest the blade lightly on a fingernail at a low angle. A sharp edge catches and holds; a dull edge slides right off. (Be careful — this test confirms sharpness quickly.)
- Visible edge damage: Under a light, look along the blade at an angle. Nicks, chips, or a bright glinting line along the edge all indicate damage that needs grinding out.
- Honing no longer helps: If the knife still feels dull after thorough honing, the edge is too far gone for realignment — sharpening is the only fix.
Knife Maintenance Tips That Extend Edge Life
Sharpening and honing are reactive — they fix problems that have already developed. Good daily habits reduce how often those problems arise in the first place. These knife maintenance tips are simple to implement and make a noticeable difference over time.

Use the Right Cutting Surface
The cutting board you use has a larger impact on edge retention than most people realize. Wood and plastic boards are knife-friendly — they have a small amount of give that absorbs the impact of the blade rather than deflecting it. Glass, ceramic, marble, and granite boards are extremely hard and will dull a knife edge in just a few uses. No matter how beautiful a marble board looks, it is not a surface to cut on with good knives.
Never Put Knives in the Dishwasher
The dishwasher is one of the fastest ways to destroy a quality knife. The intense heat warps handles, the harsh detergent degrades the blade's finish and edge, and the tumbling action causes knives to bang against other utensils, creating nicks and chips. Always hand wash knives with warm soapy water, rinse immediately, and dry thoroughly before storing.
Store Knives Properly
Loose knives in a kitchen drawer are a recipe for both dull blades and cut fingers. Each time a blade bounces against other utensils, the edge takes micro-damage. The best storage options are a magnetic knife strip mounted on the wall (keeps blades accessible and protected), a wooden knife block (classic and safe, though choose one with horizontal slots to avoid edge contact), or individual blade guards if drawer storage is unavoidable.
Use the Right Knife for the Job
A chef's knife is not designed for prying open oysters, halving butternut squash by force, or cutting through frozen food. Using a knife outside its intended purpose is one of the quickest ways to chip or roll the edge. A bread knife for bread, a boning knife for meat off the bone, and a cleaver for heavy chopping — matching the tool to the task preserves all of them longer.
Do Not Scrape Food with the Blade Edge
After chopping, many cooks drag the blade edge across the board to push food into a pile. This habit dulls knives faster than almost anything else. Turn the blade so the spine (the blunt back edge) is facing down when scraping food off the board. It takes one second of adjustment and meaningfully extends edge life.
Choosing the Right Sharpening Method for You
The best knife sharpening techniques are the ones you will actually use. A whetstone that sits unused in a drawer does nothing; a pull-through sharpener you reach for every two months does a great deal. Here is how to match the method to your lifestyle:
- You cook seriously and want the best possible edge: Invest time in learning whetstone technique. The results are noticeably superior and the skill is satisfying to develop.
- You cook regularly but want minimal friction: A quality electric sharpener is the most practical choice — fast, consistent, and beginner-friendly.
- You cook occasionally and want something simple: A two- or three-stage pull-through sharpener covers your needs without any learning curve.
- You want maintenance built into your workflow: A cutting board with a built-in sharpening slot is excellent for quick edge touch-ups as part of the cooking routine.
Many serious home cooks use a combination: a whetstone for deep sharpening once or twice a year, a honing rod before every session, and a convenient pull-through or built-in sharpener for quick touch-ups between full sharpenings. There is no rule against using multiple tools.
Frequently Asked Questions
Key Takeaways
Knowing how to keep kitchen knives sharp comes down to a few consistent habits rather than any single piece of equipment. Hone your knives regularly to maintain the edge you already have. Sharpen when honing stops working — choosing the method (whetstone, electric, pull-through, or built-in board sharpener) that you will actually stick with. And protect that edge every day: use wood or plastic boards, hand wash and dry your knives, store them safely, and always scrape food with the spine, not the edge.
A well-maintained knife is safer, faster, and more enjoyable to cook with. It slices where you intend, responds with predictable control, and makes the whole experience of preparing food more satisfying. The investment in a few good habits — and the occasional use of a honing rod that probably already lives in your kitchen — pays dividends every single time you cook.